Search This Blog

Tuesday

Steven Universe Halloween Invitations

Our little Spooky Halloween baby is so grown up and turning 12 this year! As usual, she has requested a party theme to fit her current interest and nothing is more dominant in her universe right now as Steven and the Gems. It is my goal to always fit her theme to a Halloween inspired setting. I found some amazing fan art from an SU fan that fit my invitation needs perfectly!
I modified the art size and created a party outline on Adobe then printed both 4-up on a page.
I love the torn edge look, so my idea was to tear out all of the imaging and rip the black construction paper to fit behind each image - one centered, the other off-set.I folded where I wanted all my invitation tear lines to be, then used a ruler to hold the paper in place as I tore for a straight edge. This keeps the project simple enough to complete quickly while still being super cute and giving the invitations some dimension.
Micheal's always has a great collection of card making supplies and I scored big when the 40 pack card sets went on sale 3 for $10 (they have color options of white, cream or cardboard brown). Although I originally was hoping for black, the cardboard brown turned out to be a great fit for the project. I found Halloween washi tape and the cheap kids project construction paper plus a $1 stamp and sent under $10 in store. Additionally, I used a glue stick, crafter's tape and a couple of markers.
I did not have a stamp pad and was not interested in purchasing an expensive one that would have been large enough for the stamp. Instead, using cheap acrylic paint, I used a paper plate and napkin (bounty is the best). Folding the napkin into 4 and adding paint inbetween the first fold creates a homemade ink pad. Make sure to test your stamp on scrap paper before you commit to your project to make sure you have the right amount of ink and pressure to get the best looking stamp image.
Most of the invites were addressed and mailed so I was ecstatic that the post office released its first ever Halloween stamp! All of the remaining invites for classmates where addressed with a cute "You're Invited" and cute character.
I am excited to share more as we plan and create for this Spooktacular Steven Universe Bash! ~QD

Something Wicked This Way Comes

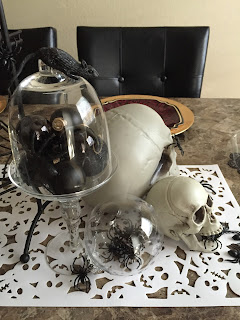
Halloween has always had a special place in our home, but nothing made it as special as the birth of our daughter, Juliette Love. She is our little "Spooky" and we go all-out each year. Although my daughter (now turning 12) chooses the family costume theme, she is gracious enough to allow my creativity flourish when it comes to decor. My favorite place to decorate is the dining room. I love finding a balance between classy and creepy.
The array of items I use come from avariety of places - some everyday items (like my tiered cupcake stands), others easily found at the dollar store (like the crows, spiders napkins and even the hanging sign). I am VERY frugal - no coupon goes to waste! My plates, flowers and skulls were all purchased at Micheal's where I went in several days to use 50% off and 40% off coupons to save some cash. All in all, the table setting cost under $25 to create. Hope you enjoy and Happy Haunting! ~QD

Thursday

Available now

The spring is my most creative time. I have a variety of artwork currently available at Virtuoso Tattoo. Stop by the shop, or give me a call for details and delivery. 


Saturday

Tiny Touches

This year has all but escaped me completely. Oddly enough, I was able to do some beautiful things. One of my favorite's, was creating a few personal touches to some clothing for my sweet little nephew. When I received this picture of him in a sweater I had embroidered his initial on, it reminded me how simple pleasures can be the greatest ones. I hope to do more this coming year with less distraction and more simple pleasure. 💛

Thursday

Sweet baby bib and headband

Every Christmas I usually get to make about 5 to 10 homemade items for friends and family. This year, the kids are slim pickins. But my 6 month old niece was a perfect fit for this project that I wanted to do. I found this great deal on Australian bibs and really wanted to do something inspired with this color palette. The small green flowers were pre fabricated and the large ones were made with scrap material and buttons. I found this sweet koala and thought it would make a perfect match for a sweet little gift.

Summer Time Titan!

My daughter has a full plate of summer classes. Art instruction, swimming lessons, junior chef prep... The list goes on. I try to keep the first week free for a little R&R coming right off the school year. So it is not unusual to get an "I'm bored" by the end of the week. This time I was able to keep it BOREDOM FREE with a quick cape project. My daughter is  8 now and her latest, greatest interest is the  Teen Titans. She loves Raven and ask for a cape. This was made with 2 yards of fabric (I spent $7.50 at Joanns) and took about 30 minutes.

Materials:

2 yards of fabric (I chose something that wouldn't fray so I did not have to seam if I didn't want to)
Sewing machine/needle and matching thread
Scissors

Steps:

- Lay out the material and fold it in half VERTICALLY (your longest side up)

- Hold the folded material with longest side up to yourself or the person you are designing for and determine the LENGTH you want (or go pro and use your measuring tape) 

- Once you have determined the length, add an additional 2-3 inches and cut straight across

- Open your material flat and do a GATHERING STITCH 2 inches (at the top of your cape) all the way across. Gather and set aside

- Using the remainder of the material (still folded) determine the size hood that you want by pinning it along the top edge to put on and determine how deep and wide you want to get the Raven look.
**The hood is the only part I seemed - While on her head, I used pins to shape the front (folding the material in and slightly angled) 

-Unpin the top and sew each of your pinned sides (these are the sides around your face) - leaving 1 inch at the top open (when you sew the top, this leaves you the option to give it that Raven point)

-Using the hood as your width guide, place the hood edge (where the hood will meet the cape) along your gathered cape edge and match the width of your cape to your hood, pin and sew (remember to have your seams lying back to back so when you are done, your seems are on the inside)

- Flip your cape inside out and sew the yop of the hood closed, shaped to your liking (if you unfold the inch you left at the top of each side and then sew all the way across the very top of the hood, you will get a front point over your head.

ALL DONE

Hope this is helpful - I do a lot of sewing organically and do little measuring so I apologize if this isn't easy to follow. This link is to a good cape video if you need some visual assistance:
http://www.youtube.com/watch?v=2tUxlXkCUro

Saturday

You can Count on Giving..

I love the holidays, regardless of how busy or stressful it begins, it always ends with joy in our household. Christmas seemed to sneak up on us this year so quickly, that even the kids were surprised. While shopping in early November, Juliette told me with such passion, "I can't believe that every store is already trying to sell Christmas stuff! It is not all about shopping you know! Christmas is about giving, NOT receiving." With that in mind, I knew Juliette needed a twist on the old chocolate advent punch out calendar this year. One that would keep her inspired to GIVE as well as receive. After all, there is nothing more humbling than a countdown to the arrival of Christmas in the spirit of our most precious gift, Jesus. CHRISTMAS STAR ADVENT CALENDAR COUNTDOWN STARS This project was pretty simple, cost about $15, and took me about 2 hours to assemble and hang. I used: Cut out stars from the craft store(two sizes), hot glue, craft glue, spray adhesive, red tissue paper, glitter, clear sewing thread, stapler, a gold opaque marker and my printed notes I made in a word document
My print out of GIVE notes consisted of things I knew would challenge the kids and a few they already loved to do. I threw in 3 'receive' notes for a special treat along the way.
I layered my tissue paper to have the exact number I needed to cover my stars. I had 10 large and 14 small. I traced the star and cut out the trace on the inside of the outline.
I used a craft glue pen, outlining the edges of the star, folded and placed a note in the center, then carefully laid my tissue paper cutout over the top, sealing it around each edge. Be careful to not use too much glue and to adhere the tissue to match the angles.
After I finished 'loading' all of the stars, I used a gold marker and numbered each one to the 24th. Since we celebrate on Christmas Eve, we did not include a 25th star. I then sprayed the opposite side with adhesive, laid down the clear thread and double adhered it with a smudge of hot glue before I glittered each one.
Once I had it glittered, I decided what length I wanted it and cut it from the thread spool. I immediately hung each one, making a simple loop knot and stapling it to the ceiling over the mantle.
Juliette absolutely loves it and I am pretty pleased with how the 'calendar' turned out. I hung the numbers in various order and depth and height so it is fun to search for each day.
Now, let the GIVING begin!

Thursday

Stencil Me QD..

Just finished this fun mixed media, split canvas painting with about 100 variations of 'Queen Deso' tagged with a self portrait stencil overlay. What do you think?

Tuesday

Take it to the MAX

I have been so excited to see all the MAXI SKIRT tutorials online, I finally had to try my hand at. I have to say, the amount of material to work with was overwhelming, but once I got my skirt width done, I felt much better... I initially used this MAXI DRESS TUTORIAL but decided I wanted a skirt and modified. In the fashion of upcycling, I used ONE WHITE FULL SIZE JERSEY KNIT SHEET and blue dye. I cut the waist strap/tie from the bottom of my dress (since I made it long enough for extra material). Hope you like it! ~QD

Sunday

Wrap that Wrist

As usual, I am trying to use every scrap of the shirts I chop. This week, I am making T-shirt bracelets out of jersey knit t's.

I love the color contrast in these and plan to have a handful on sale at the upcoming ladies night in Arlington. 30 will go in to goodie bags for early attendees.